
How to connect Canon printer to WiFi without cable if you have never done it before? If that sounds like you, you are in the right place. Setting up your first printer can be an overwhelming experience. At the same time, it can be a cakewalk if you know how to do this. Today, printer companies are trying their best to make the printer as user-friendly as possible, but some of us still get stuck in between during the setup. So, what needs to be done now? Is there any easy way to learn ‘how to connect my Canon printer to my laptop wirelessly‘? The answer is YES!
Ever since I worked as a technical support specialist for a reputed printer company, I have been adept at printer setup. So, take a sip of your coffee, settle into your chair, and know that I’ve got your back! Through this guide, I will help you step-by-step to connect your printer to WiFi. Let’s dive in!
Step 1: Requisite Environment for a Wireless Connection
In the first step, we are basically going to talk about the right environment needed for a wireless or WiFi connection. Before you know how to connect Canon printer to WiFi without cable, ensure that you have the following:
1. A Wireless Router
In brief, a wireless router is a device that connects network devices such as a phone, computer, printer, and so forth to the internet. Thus, it enables communication between your devices and the router.
A wireless router is necessary for the instructions provided in the second step. Also, you need to ensure that your router is set up properly to connect your printer to WiFi cableless.
2. A Compatible Device Connected to the Internet Network
So, which device are you going to use? A laptop or a PC? Whichever you use, make sure it is connected to your network. To confirm whether your laptop is connected to the network, open a browser and visit any site.
Once done, let’s examine the second step, which explains how to connect Canon printer to WiFi without cable.
Step 2: Connect Your Printer to WiFi via Cableless Setup
In this step, I will show you how to prepare for wireless setup. Before you delve into the following steps for wireless connection setup, ensure your printer is on. Then, follow the steps given below to establish a connection between your printer and WiFi:
- Head to your printer control panel and click on a button with a plier and screwdriver icon.
- After that, you have to use the navigation arrow button to select the option: Wireless LAN setup.
- Then, select the Other setup option and press the OK button on the control panel.
- Next, choose Cableless setup and hit the OK button.
Congrats! Your printer is finally prepared for a wireless LAN connection using a cable setup method.
But wait! You are not done yet!
The connection between your router and printer is still incomplete.
In order to understand how to connect Canon printer to WiFi without cable completely, you will need to install the software. Let’s see it in the next step.
Step 3: Download Printer Drivers on Windows
Before we proceed with the steps below to download the software, ensure you have stopped all the applications running on your computer. Also, you need to log in using an administrator account. Once you are all set, let’s get right into the following steps:
- Open your laptop’s browser and visit canon.com/ijsetup.
- On the next page, select your region, printer name, and computer OS.
- On the Product Setup page, tap on Download and wait until the software is finished downloading.

- Once downloading is done, you have to open a Downloads folder in your File Explorer.
- Inside the Downloads folder, find the .exe file.
- Then, double-click on the .exe file to start the installation.
- After that, click on the Next button.
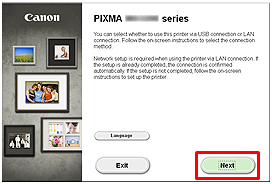
- Also, choose the Wireless LAN Connection option
- Hit the Next button.
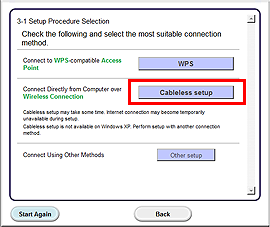
- Now, select the Cableless setup from the dialog box.
- If you see a .NET Framework screen, click Yes and proceed.
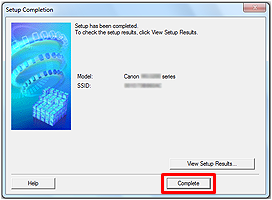
- Select Next, and when you see the Setup Completion dialog box, hit Complete.
- Select the Next button.
- After installation, a Test Print window will appear.
- Load the paper into your printer and select Execute.
- Once you have done the print test, select Next.
- Finally, hit the Exit button to finish the installation.
Now that you know how to connect Canon printer to WiFi without cable, you can embark on your printing journey without a hitch!
Frequently Asked Questions (FAQs)
Question 1: What do I need to connect Canon printer to WiFi?
Answer: Before you connect your printer to your WiFi network, you must ensure that you have a WiFi router and a compatible PC or laptop. You must also connect your computer to the Internet and ensure that you have set up your router properly. Once you are all set, you can easily connect your printer.
Question 2: What are the ways to connect Canon printer to WiFi?
Answer: There are three ways to connect your printer to your WiFi. All of them are simple to follow, and hence, you can easily try them to set up your printer. Take a look at the three methods given below:
- WPS Mode
- WPS PIN Code
- SSID and Password
Question 3: Why is my Canon printer not connecting to WiFi?
Answer: Many reasons are responsible for why you are unable to connect your printer to your WiFi. Have a look at the following causes:
- Incorrect network settings on your printer
- Poor signal strength from the WiFi router.
- Entering the wrong network password into the printer
- Disabled WiFi function on your printer